Yes, you can manually assign an IP address to Camio Box if your network prohibits the use of DHCP. The instructions differ based on whether the Box initially is with DHCP or without DHCP.
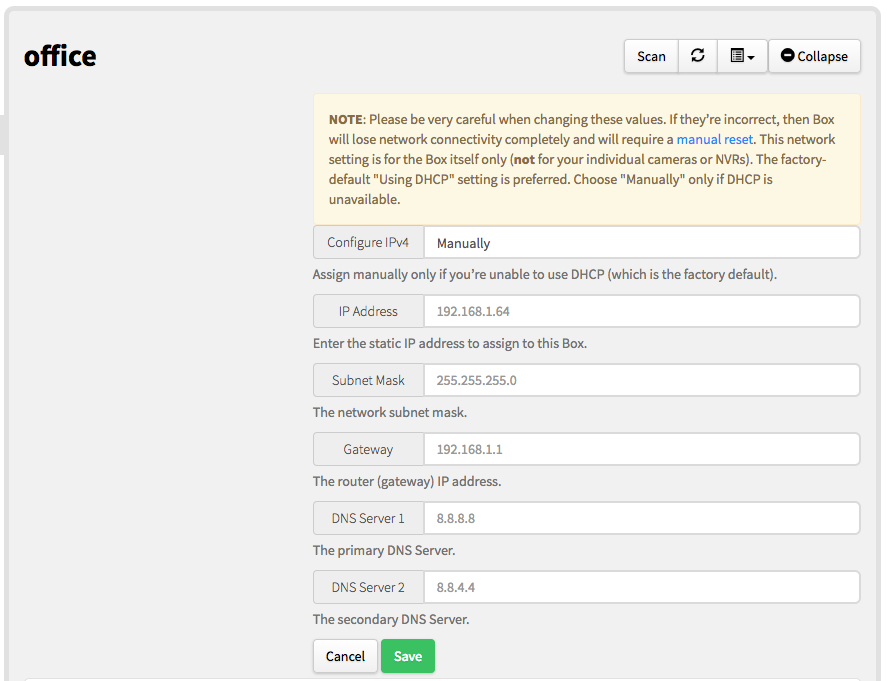
NOTE: Normally, you should stick with Camio Box's default setting to use of DHCP to obtain its IP address dynamically. Camio Box has no need for inbound network connections, so there is never a reason to reference it by a static IP address. However, some corporate networks require special authentication that blocks use of DHCP. In that case, you can manually assign an IP address, subnet mask, gateway router, and DNS Servers using the dropdown menu option Change network settings in the upper right of your camio.com/boxes page.
To assign an IP address manually:
With Access to a DHCP-enabled Network
Use the steps below if you have a DHCP-enabled network that you can use to temporarily bring the Camio Box online while you configure it to request a static IP-address.
- Make sure your registered Box is powered-on and connected to a DHCP-enabled network.
- Open your camio.com/boxes page.
- Choose Change network settings from the dropdown menu to the right of the Box's name:

- Enter all fields carefully, since a data entry error will disconnect the Box from the network and require a manual reset:

- Press Save to apply the new settings. The Box will take about 20 seconds to restart with the new settings.
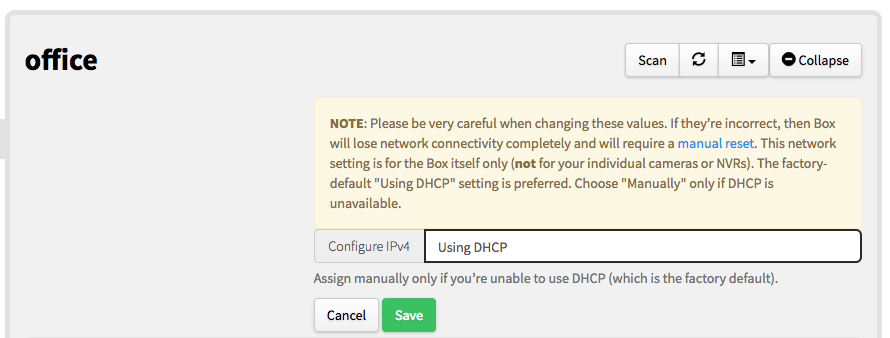
To return to the default use of DHCP:
- choose Using DHCP from the same menu panel:

- Press Save to apply the new settings. The Box will take about 20 seconds to restart with the new settings.
If you're unlucky and enter incorrect values that disconnect Camio Box from the network, then read how to reset settings manually with the use of a USB stick.
Without Access to a DHCP-Enabled Network
Use the steps below if you need to assign a static IP-address to Box but don't have access to a DHCP-enabled network that you can temporarily use to bring the Camio Box online.
What you will need:
- Computer with a text-editor
- USB stick (formatted in FAT, ext3, or ext4)
Steps:
- Open a text editor on your computer
- Create a file called box_config.json. This file will contain configuration data in the JSON format.
- Put the following text in the file and replace each {{mustache variable}} (inclusive of the {{ }}) with the correct value:
{
  "network_configuration": {
    "ip_assignment": "static",
    "ip_address": "{{ip_address}}",
    "netmask": "{{network_mask}}",
    "gateway": "{{gateway}}",
    "dns_servers": [
      "{{dns_server_1}}",
      "{{dns_server_2}}"
    ]
  }
}
Replacing
- {{ip_address}} with the static IP-address you wish your Box to request (like 192.168.1.41)
- {{netmask}} with the network mask for the network you wish Box to use (like 255.255.255.0)
- {{gateway}} with the IP address of the gateway on your network (like 192.168.1.1)
- {{dns_server_1}} with the main DNS server address (recommended 8.8.8.8)
- {{dns_server_2}} with the secondary DNS server address (recommended 8.8.4.4
NOTE - if you need to configure a non-default NIC, you can include an optional field interface_name to apply the settings to that particular network interface. - Insert the USB stick into your computer
- Move the box_config.json file into the root of the USB stick.
- Unmount and remove the USB stick from your computer
- Power off the Camio Box (unplug it)
- Insert the USB stick into any one of the USB ports on your Box
- Power on the Camio Box
At this point, the Box should power on and read in the configuration file, then configure its network settings based on the given values. Once the Box is done reading in the configuration values, it will rename the file from box_config.json to applied.box_config.json. If the values provided are valid settings for your network, the Box will come online and you can register it at https://camio.com/box/register.
Comments