NOTE: The following is a legacy guide for deploying the Camio OnGuard Gateway using Docker. We recommend all new deployments use the Kubernetes deployment installed through Helm.
New Camio User Guide for OnGuard: Camio User Guide for OnGuard: Tailgating detection and real-time video search
Instructions for PACS Gateway Helm installation: Camio User Guide for setup and deployment of Camio PACS gateways on Kubernetes
This Camio User Guide covers:
- Overview of Camio with OnGuard
- Mapping cameras to OnGuard readers
- OnGuard License and OAAP Interface
- Camio Setup for OnGuard
- OnGuard Permissions Setup
- Camio Labels
Download Camio Gateway Package: https://storage.googleapis.com/camio-integrations/camio-onguard-package.zip
Overview of Camio with OnGuard
Fast visual verification and tailgating detection
Camio enables fast search and alerts on events like tailgating, entry ajar, forced open, entry unlocked. Read more at https://camio.com/tailgating. Skip to Linux or Windows installation and resource requirements.
Camio counts the number of people that pass through the door to compare that number to the actual number of OnGuard access granted events. If those counts don't match, then the video is annotated with "tailgating" unauthorized access. This video illustrates tailgating detection as the floor plane tiles turn red when the second person enters after only one access granted event:
Works with existing cameras
Setup takes less than 15 minutes. Each camera is mapped to the OnGuard reader so that events from those readers annotate the video from that camera. You configure the on-premise Camio Gateway with the credentials required to subscribe to OnGuard access control events.
Mapping cameras to OnGuard readers
The first step is to associate your OnGuard readers with any cameras that can see the doors controlled by those readers.
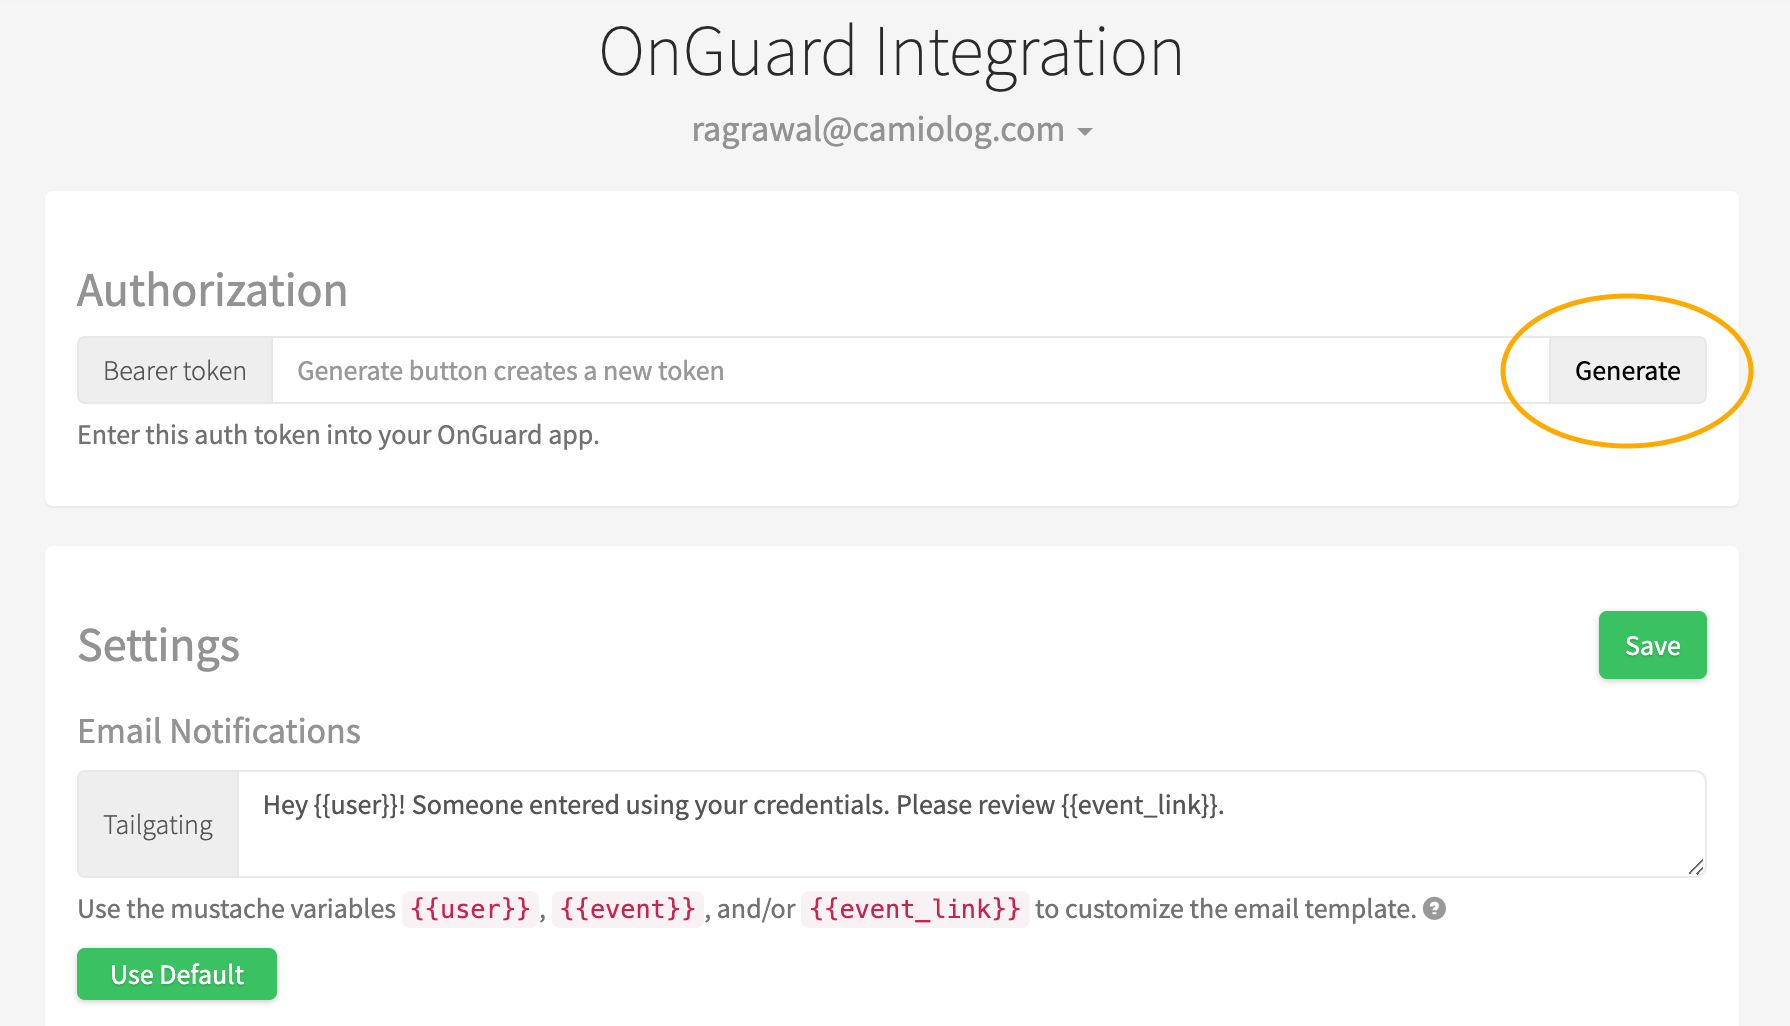
- Generate your CamioAuthorization token to be used by the Camio Gateway to annotate video with incoming access control events.
- Sign-in as the Camio account manager and press the Generate button at https://camio.com/settings/integrations/onguard
- Either the account owner or a guest with Can Manage permission can generate the token
- A token created for a user of a registered domain works for all users on that domain (not applicable to public domains like gmail, yahoo, etc.)
- Copy the token immediately after you generate it, since you will not be able to retrieve it again later.
- Paste the token into your Camio Gateway camio_config.yaml as camio_onguard_auth_token value
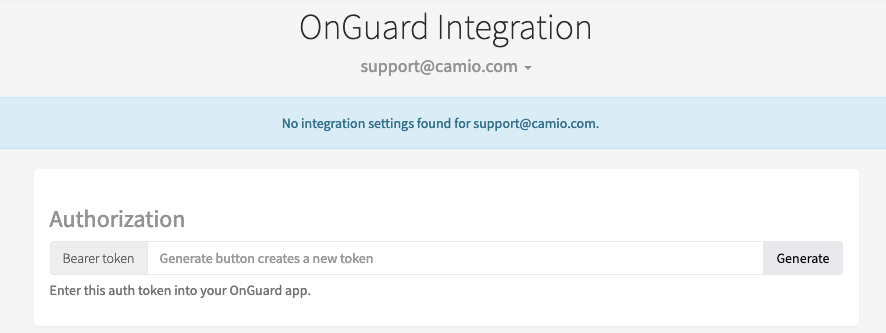
- Note: If you see a message "No integration settings found..." that means integration settings have never been saved for this account. Configure the settings and hit save. When you reload the page, the message should be gone.
- Sign-in as the Camio account manager and press the Generate button at https://camio.com/settings/integrations/onguard
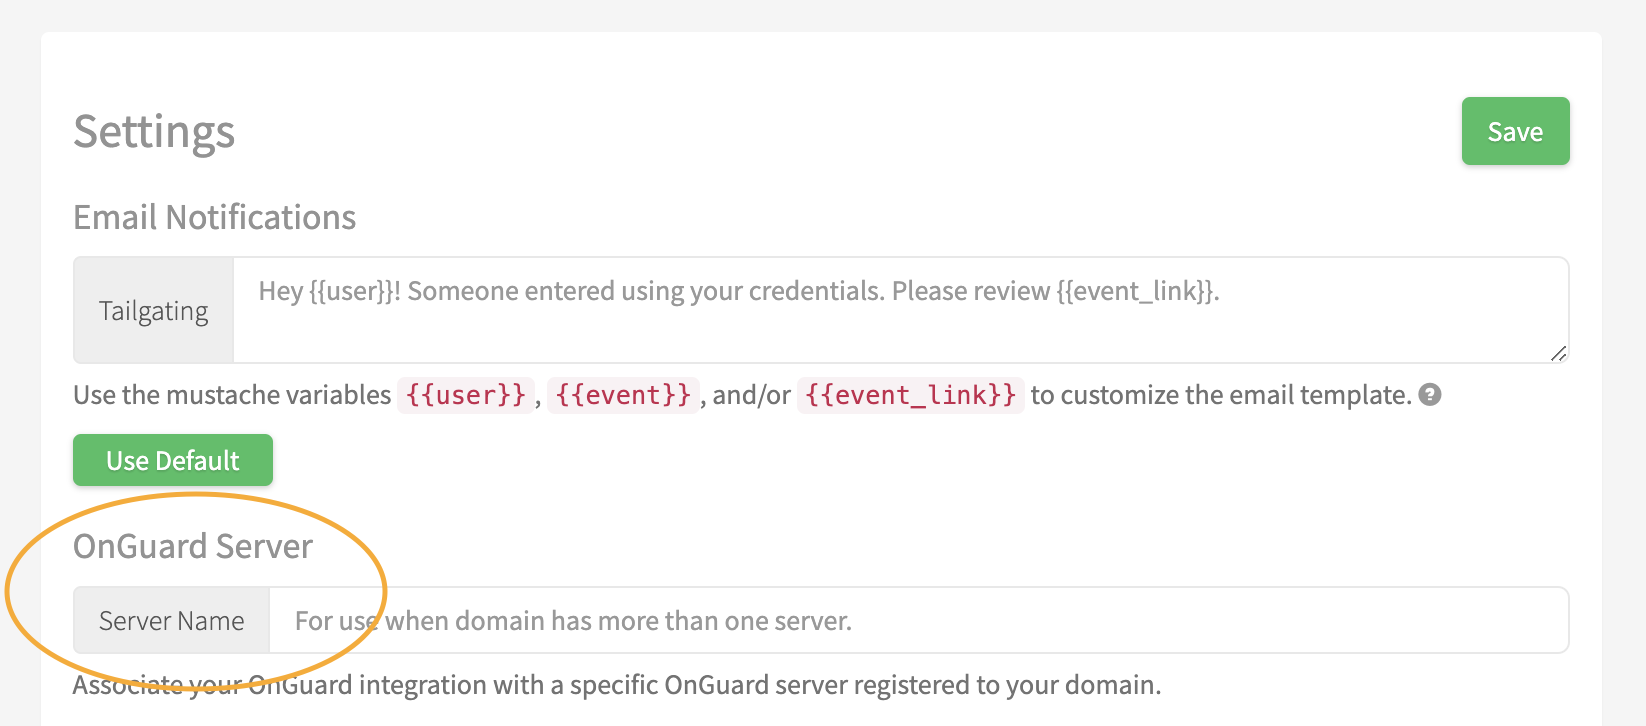
- [Registered Domain Only] It is required to add an OnGuard server name to the integration if the user is a member of a registered domain that has more than one Camio gateway.
- Including an OnGuard server name means this user will only receive device payloads from the Camio gateway(s) with the same OnGuard server name. A Camio gateway is assigned an OnGuard server when the user whose token is provided to the gateway assigns an OnGuard server name on their integrations page.
- Excluding an OnGuard server name means the user receives all OnGuard readers across all of the registered domain's Camio gateways, which may cause the readers displayed on the integrations page to vary.
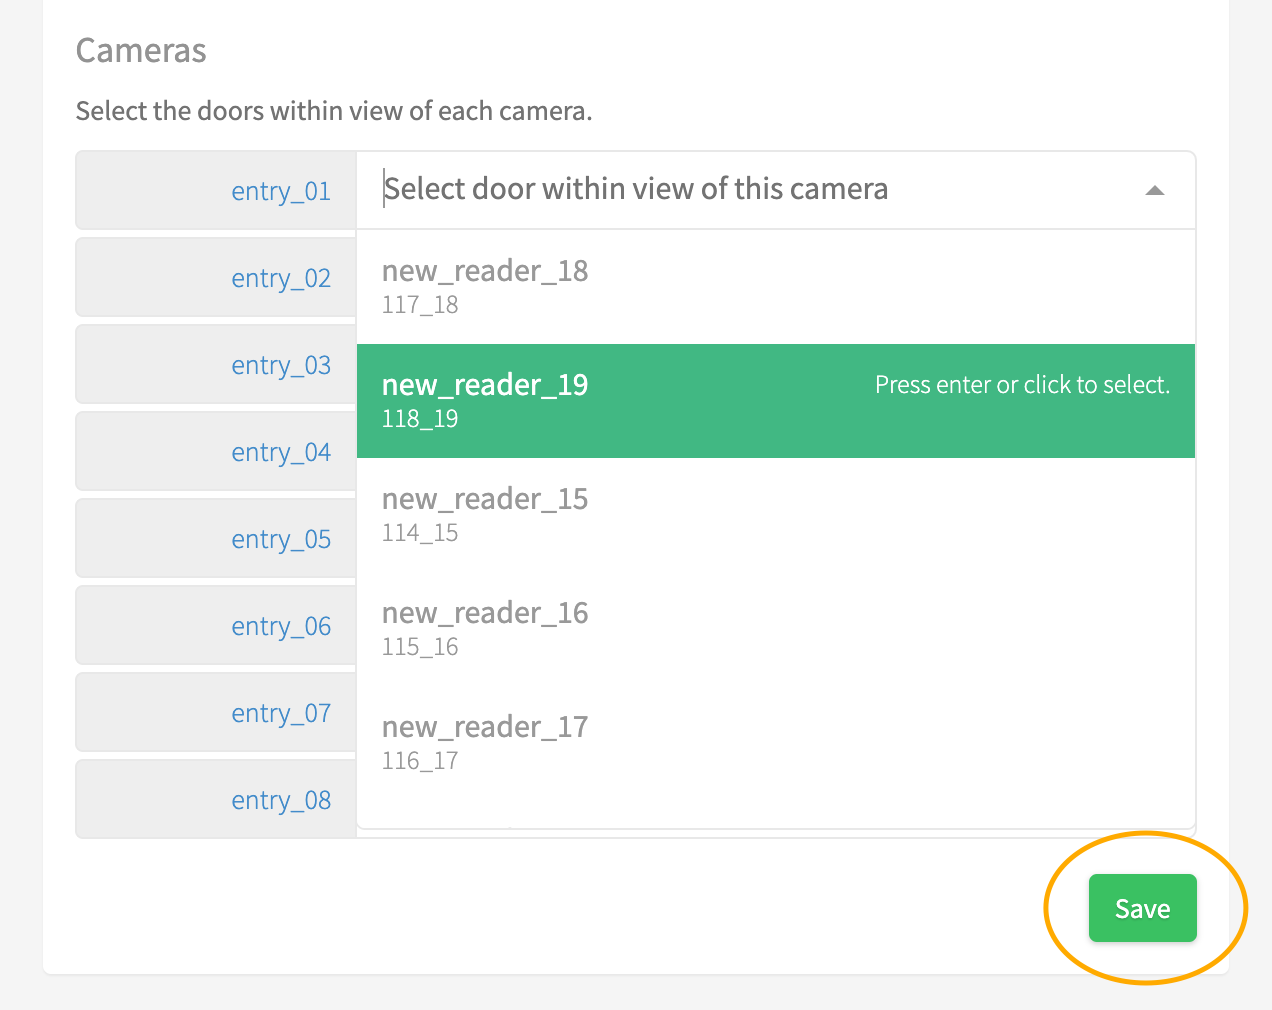
- Select the OnGuard Reader from the dropdown list next to each camera that has a view of the people entering the door associated with that reader and press Save
OnGuard License and OAAP Interface
Please obtain an OnGuard License for Camio by contacting your Lenel sales representative and asking for the Camio part number IPC-096-CAMI01-B. The Camio Gateway uses the OAAP interface described OpenAccess Alliance Program Factory Certified Product (FCP) Interface Document.
Camio Setup for OnGuard
The Camio Gateway subscribes to OnGuard access control events in order to annotate the video associated with each event.
Camio Gateway Installation
The Camio Gateway runs as Docker containers on any host machine (e.g. Linux, Windows) that can access the OnGuard server. If your firewall restricts the sites contacted, then please see firewall rules.
Camio Gateway Configuration Files (yaml files)
The Camio Gateway's configuration is determined by yaml files. Upon first startup of the Camio Gateway, these yaml files are encrypted and deleted so that secret credentials are never stored in the clear. To supply new option values, you must stop the containers, add the yaml files to the res directory, and restart the Docker Containers so that they read and encrypt the yaml files once again. See Updating Configuration Files.
| Filename | Description |
| camio_config.yaml |
This contains your secret Camio Authorization token obtained from https://camio.com/settings/integrations/onguard used to annotate video. Example: CAMIO_CONFIG:
|
| onguard_config.yaml |
This contains the non-secret information required to connect to your OnGuard server. Example: ONGUARD_CONFIG:
server_name: "onguard_server.yourdomain.com"
# "false" = disable SSL cert verification
# "self" = use certificate chain bundle specified in "ca_bundle" below
# {any other string, e.g. "true"} = SSL certificate was generated from a well-known CA such as Verisign, Thawte, or GoDaddy
|
| onguard_user.yaml |
This contains your secret OnGuard username and password required to access the OnGuard server. See the User Permissions Required. Example: ONGUARD_USER:
directory_id: "your OnGuard user directory here (e.g. id-1)"
user_name: "your OnGuard username here"
password: "your OnGuard password here"
|
| advanced_config.yaml |
These default values should be sufficient, but override any desired. Retain the query_filter, so that only recognized OnGuard Events are sent to Camio. Example: ONGUARD_ADVANCED_CONFIG:
query_filter: '(event_type="0" or (event_type="2" and event_subtype="4") or (event_type="4" and (event_subtype="8" or event_subtype="10" or event_subtype="210" or event_subtype="211" or event_subtype="212" or event_subtype="213")))'
# Uncomment any settings where default values shown need to be modified
# (default values should work for most deployments, except where the OpenAccess port number was changed)
|
OnGuard Event Filter
The query_filter above in advanced_config.yaml correlates to these OnGuard Event SubType Descriptions:
- Access Granted
- Access Granted on Facility Code
- Access Granted No Entry Made
- Access Granted on Facility Code, No Entry Made
- Access Granted
- Access Granted: Reader Unlocked
- Egress Granted
- Open Door Command Issued - Door Used
- Open Door Command Issued - Door Not Used
- Granted Access, Common Pin
- Grant Last User (Override)
- Granted-Escort
- Granted-Exit-Escort
- Granted-Master
- Granted-Exit-Master
- Granted-Dual Custody
- Granted-Exit-Dual Custody
- Granted-Pending Entry
- Access Granted Entry Made
- Access Granted to Destination Floor
- Granted Double Card
- Access Granted: Pin
- Access Granted: Lift
- Access Granted: Soft Passback
- Access Granted: Time and Attendance In
- Access Granted: Time and Attendance Out
- Granted-Escort Pending
- Duress
- Access Granted Under Duress
Access Denied Under Duress
Access Granted Under Duress - No Entry Made
- Access Granted Under Duress
- System
- Door Forced Open
- Door Held Open
- Door Forced Open Masked
- Door Forced Open Unmasked
- Door Held Open Masked
- Door Held Open Unmasked
Installing on Linux
- Download and install Docker by following the steps for your Linux distribution from: https://docs.docker.com/engine/install/
- Download and install docker-compose by following the steps from: https://docs.docker.com/engine/install/
- Download the Camio Gateway run package from: https://storage.googleapis.com/camio-integrations/camio-onguard-package.zip
- Unzip the package
-
unzip camio_onguard.zip
cd camio_onguard
cd res
ls -l
-
- Update the configuration files with Camio and OnGuard information
- Once the config files have been updated, run the Camio container
-
docker-compose up -d
docker ps | grep camio_onguard - If you want to run the container in foreground, then remove `-d`
-
docker-compose up
-
- The Camio Gateway containers are now running. You can use Docker commands to watch stats and logs whenever required.
Installing on Windows
- Download and install Docker Desktop (which also contains docker-compose) by following the steps from: https://docs.docker.com/docker-for-windows/install/
- Download the Camio Gateway run package from: https://storage.googleapis.com/camio-integrations/camio-onguard-package.zip
- Unzip the package, and enter into the camio_onguard directory
- Update the configuration files with Camio and OnGuard information
- Once the config files have been updated, run the Camio container
-
docker-compose up -d
docker ps | grep camio_onguard - If you want to run the container in foreground, then remove `-d`
-
docker-compose up
-
- The Camio Gateway containers are now running. You can use Docker commands to watch stats and logs whenever required.
Updating configuration files
- When you need to update the configuration files, you first need to stop the containers by running
-
cd camio_onguard
docker-compose down
-
- Wait for the containers to stop, and then add the new configuration files in the res directory.
- Note that due to encryption and security, all of the existing configuration files in clear text will not be present in the res directory, so you will need to add fresh new configuration files in the res directory.
- After adding the new configuration files, restart the containers by running:
-
cd camio_onguard
docker-compose up -d
docker ps | grep camio_onguard
-
- The Camio Gateway containers are now running with the updated configuration files. You can use Docker commands to watch stats and logs whenever required.
Camio Gateway Host Hardware Requirements
The CPU and RAM required of the host machine that runs the Camio Gateway Docker containers varies with the maximum throughput of access control events. This guide covers common volumes:
|
Max Event Rate |
CPU Cores |
RAM |
|
100 events/second |
1 |
300 MiB |
|
1,000 events/second |
2 |
400 MiB |
|
10,000 events/second |
2 |
400 MiB |
Firewall Rules
During the initial docker setup (docker-compose up -d) will need access to these domains:
- gcr.io
- storage.googleapis.com
- dockerhub.com
During operation the proxy will need access to the specified camio endpoints:
- https://camio.com/api/integrations/onguard/webhooks
- https://camio.com/api/integrations/onguard/stats
- https://camio.com/api/integrations/onguard/logs
as well as the OnGuard server, check your network setting for your OnGuard system.
OnGuard Setup
OnGuard System Permissions
The Camio Gateway needs to authenticate with OnGuard’s API (OpenAccess) and needs a user account with sufficient permission. Using the default Admin level of permissions when creating this account is simplest. But if using Admin access violates security policies, the basic permissions required (outside of Field/Page Permissions being “View/Edit All Fields”) are highlighted in the System Permission Groups screenshot below:
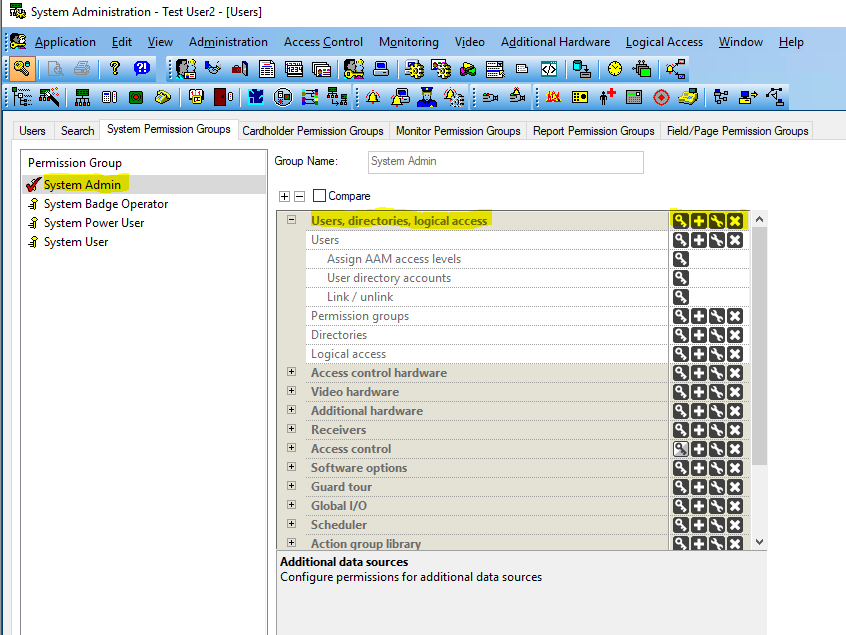
The non-Admin permissions correspond to:
- Assign AAM access levels: Read, Add, Modify, Delete
- User directory accounts: Read
- Link / unlink: Read
- Permission groups: Read, Add, Modify, Delete
- Directories: Read, Add, Modify, Delete
- Logical access: Read, Add, Modify, Delete
If not using the default Admin Level of permissions, then also ensure all cardholder and badge fields are set to visible / editable. By default, those fields are visible / editable, however certain versions of OnGuard may have exceptions on the default permissions on fields that customers add through forms designer (this can be badge or cardholder).
Camio Labels
These are the labels that will be either:
- applied to video Events when the door reader is mapped to a camera, or
- relayed to Domain Endpoint callbacks when there is no video Event associated with the reader.
entry.unlocked
entry.forcedopen
entry.ajar.started
entry.ajar.ended
entry.denied
entry.commslost.started
entry.commslost.ended
entry.rex
entry.rex.shunt
entry.rex.used
entry.rex.notused
entry.shunt
entry.offline.started
entry.offline.ended
See also OpenAccess Alliance Program Factory Certified Product (FCP) Interface Document.
Comments